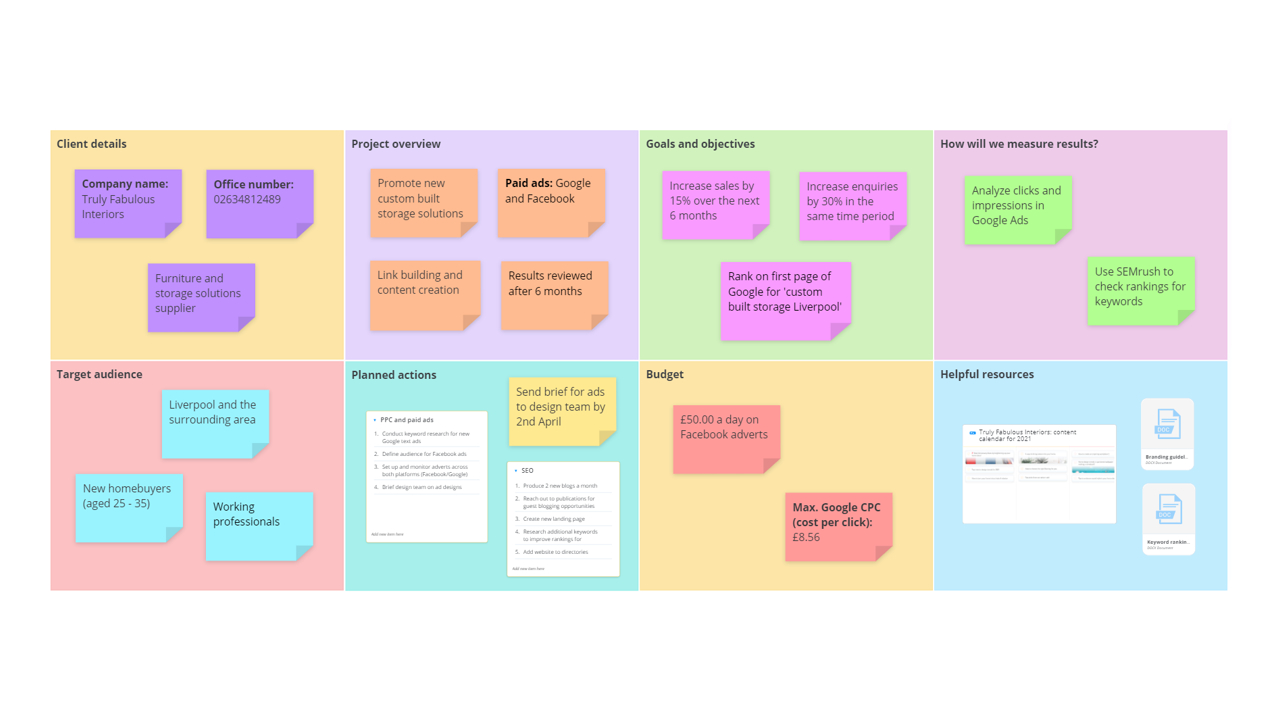
Client Project Brief template

Ayoa’s Client Project Brief template will provide you with the perfect canvas to clarify the goals, budget, target audience, planned actions, and any other important details relating to your client project, so you can ensure that everyone is on the same page before any work begins.
What is a Client Project Brief?
Working with clients to help them reach their goals can be an extremely rewarding experience, but one that can be difficult to run smoothly if communication isn’t maintained at each stage of a project – from initial planning to completion, and everything in between. This is especially true if your client has specific objectives that they are hoping to achieve from their project.
Our Client Project Brief template will help you to ensure that every detail of your client’s project has been clarified and agreed upon before the work begins, so you can ensure that your client and your internal team are clear on exactly what will be delivered, when it will be delivered, and why. This means you can then avoid disruptions being made to the project being put into action.
The template can be easily shared with your clients in Ayoa and includes dedicated sections for you to outline all the vital details you need to get started, such as your goals and objectives, budget, target audience, planned actions, and how you will measure results.
Once you have clarified the details of the project using the Client Project Brief template, you can then use Ayoa’s Project Management template (which is in the format of a clear and easy-to-use task board) to create manageable tasks and assign them to appropriate members of your team.
Why should you use our Client Project Brief template?
Our Client Project Brief template is perfect for any businesses or freelance specialists that work with clients on various projects. For example, you might be a branding agency helping a client to reinvent themselves, a freelance web designer creating a website for a brand new company, or a marketing agency that works with clients on an on-going basis to manage their PPC, SEO and social media strategies.
Using our dedicated template to create a project brief before any work begins will enable you to determine exactly what your client wants from you and your team. Using this information, you can then set realistic expectations for the project in advance and check that your client is happy with what has been planned. This will help you to establish better relationships with your clients that are built on trust, meaning that they will be more likely to continue working with you in the future – and if they have a good experience, they may even recommend you to others.
Taking the time to sit down with your client and outline the finer details of their project (such as goals and objectives, how these will be measured going forward, and the actions you are going to take to achieve them) will avoid any unexpected disruptions to the project. Keeping all of this information in one place also means that your client and your in-house agency team can keep referring back to the project brief to make sure that you are on track to meeting any goals you’ve set, as well as check that no important details have been missed.
How to use our Client Project Brief template
Our Client Project Brief template is ready and waiting for you in the app – all you need to do is share it with your clients and start filling out the sections with the relevant information! Discover how to do this successfully using the steps below.
To access the template, sign up to Ayoa. Once you've signed up, navigate to the homepage to create a new whiteboard, mind map or task board and choose this template from the library.
Before you get started, use the text section at the top of the template to add a name for your project. To change the example text, double-click on it to open the editing options. You can then add your own text, change the size and color of it and even add emojis!
CLIENT DETAILS. This section of the template should be used as a reference for yourself (if you’re a freelancer) or your team (if you work for an agency or part of a wider team). Using sticky notes, add any useful information about your client, such as their company name, the industry they operate in, and their contact details. This ensures that everything you need is in one place if you have any questions or concerns down the line.
PROJECT OVERVIEW. In this section, work with your client to write a brief overview of the project. As simply as possible, define what you’re trying to do, why you are trying to do it, and how you are going to do it using sticky notes and lists. You should also make a note of the expected timeframe for the project.
Tip: Use the menu (on the left-hand side of the app) to drag and drop elements onto the board, such as sticky notes, lists, documents, images, and more.
GOALS AND OBJECTIVES. Now it’s time to define the project’s goals in more detail. Try to be as specific as possible by defining percentages and timeframes for each objective, as this will allow you to easily determine if you’re on track to achieving your goals and whether they need to be adjusted as time goes on.
HOW WILL WE MEASURE RESULTS? In this box, outline how you will know whether the project has been successful. For example, if you’re running a PPC campaign in Google Ads to increase traffic to a website, you should use the program to analyze the number of clicks your adverts are generating.
This section isn’t just useful for your team to refer back to; it will also encourage trust from your client. Not only will they be reassured that you will be able to accurately report on the results of the project, but that you are doing everything you can to ensure it is a success.
TARGET AUDIENCE. In this section, define who the project’s target audience will be. If you don’t know the answer already, ask your client the following questions about the type of customers they want to attract: What is their age group? Do they work in a specific industry? Are they parents? Are they based in a particular location? What are their interests?
Make a note of your answers to each question using sticky notes.
PLANNED ACTIONS. In this section, use lists to outline the tasks that will make up the project. Ask yourself; what actions can you take to reach your client’s goals and objectives? What can you realistically deliver?
BUDGET. If you have a set budget that you need to stick to (for example, if the client doesn’t want to pay too much for a feature in a news publication), make a note of this here. You can then refer back to this section to check if you’re staying on track or determine if you need to increase your budget to generate the results you need.
HELPFUL RESOURCES. Finally, use this box to add any information that may help you, such as links to documents and other Ayoa boards you’ve created that are related to the project and you want your client to be able to access. This could be a mind map with ideas for future blog posts or a task board where you will be managing the tasks involved in your project.
